

Online Booking Tools: 6 Features Small Teams Need
I’d choose a booking tool by how much scheduling work it removes. At 60 appointments a week, just 4 minutes of admin per booking adds up to 4 hours. Start by listing your booking channels, staff hours, and service rules, then check these six features:
- Real-time availability: Keep booked slots, breaks, and reserved equipment off the booking page.
- Two-way calendar sync: Send bookings to staff calendars and use busy events to block availability.
- Automated confirmations and reminders: Send appointment details and change links without staff follow-up.
- Staff scheduling: Match bookings to qualified staff, working hours, and prep time.
- Customer rescheduling and cancellation: Let customers make changes within your stated rules.
- Website and Facebook booking: Connect both channels to the same live schedule.
My final check: <u>test the whole process on a phone</u> – book, check conflicts, reschedule, cancel, and check messages. If staff still have to fix calendars or send routine notices, note that work before choosing.
Map Your Team’s Booking Process
List every booking source – phone, website, Facebook, and walk-ins – and who adds each booking to the calendar. Phone and walk-in bookings need to appear on the same calendar as online bookings. Otherwise, booked slots may still look open.
Next, list every calendar your staff checks daily. Include work and personal calendars that affect customer availability, and mark which need two-way sync. Put one person in charge of working hours, holidays, and breaks. An empty calendar slot doesn’t always mean someone is available.
Map each service to qualified staff, its duration, and any shared space or equipment it requires. Account for setup, cleanup, and preparation time, too. Before comparing features, set your minimum booking notice and the hours when each service is offered.
Document who updates the calendar and contacts customers when a staff member becomes unavailable. Set a clear cutoff for cancellations and rescheduling, and state whether late changes affect deposits.
For example, require changes at least 24 hours before the appointment.
Build these rules into the booking process so customers don’t need a follow-up call. Use this baseline to check what the tool can handle and whether it reflects your rules and availability in real time.
sbb-itb-303bd8e
1. Real-Time Availability
Test whether those rules carry through to the live booking page.
Customers should be able to book open slots immediately, with availability based on working hours, appointments, breaks, and blocked time off. Live availability turns your mapped process into a schedule customers can use while helping prevent double bookings.
When staff save a phone booking in the dashboard, the slot should be blocked there and disappear from the online booking page immediately. Log the appointment during the call, not afterward. Small teams don’t need a separate admin task after every call.
Check what happens when two customers choose the same slot. Open the booking page on two devices and try to reserve the same time on both. The system should stop the second reservation, even if both screens first showed the slot as available.
Availability should also account for the full service duration, buffer time, and required rooms or equipment. These resources are often bottlenecks for small teams. A free staff member shouldn’t make a slot bookable if the room or equipment needed for that service is already reserved.
Next, check that calendar sync keeps those openings accurate across staff schedules.
2. Two-Way Calendar Sync
Once live availability is accurate, check whether staff calendars stay in sync. Two-way sync should update both sides automatically: new bookings appear on staff calendars, and busy events block those times on the booking page.
Connect every calendar that affects availability – including personal calendars – so staff don’t have to check schedules manually before each booking. Check privacy settings, too. Customers should see blocked time, not private event details.
Before publishing the booking page, add a busy event and confirm that it blocks availability. Then reschedule and cancel a test booking. The old slot should reopen, the new slot should close, and cancellation should free that time again.
With both directions tested, check how the tool handles reminders and confirmations.
3. Automated Confirmations and Reminders
Confirmations and reminders should work without manual follow-up. An instant confirmation reassures customers that they’re booked. Scheduled reminders help them remember to show up.
Choose adjustable timing: an instant email confirmation, a 24-hour reminder, and a text 2 hours before the appointment. Use email for detailed instructions and text for a short-notice nudge. Match the timing to your service window to help reduce last-minute no-shows.
Each message should include the date, time, time zone, location or meeting link, and prep instructions. Add direct reschedule and cancellation links so customers can make changes after hours.
Before sending texts, check SMS consent tracking and per-message fees. Then run a full test on a phone to make sure every link works.
Next, check whether staff scheduling keeps availability accurate across shifts, breaks, and roles.
4. Staff Scheduling
Calendar sync only works if bookings go to the right people. Customers should see only times that qualified staff can cover. Set each employee’s working hours, breaks, time off, and eligible services so open slots match their availability.
Add buffer time for cleanup, travel, or prep. Set minimum notice for bookings, and account for shared rooms or equipment in your booking rules.
Let customers choose a preferred staff member or “any available staff member.” If the tool assigns staff automatically, check whether its round-robin rules use workload or priority – and still respect staff qualifications.
Before launch, mark an employee as unavailable and check that customers can’t book them. Test “any available staff member” to make sure it follows your assignment rules. Then test a last-minute absence: the slot should reopen or the booking should move to another staff member, based on your rules, without manual cleanup.
Next, test whether customers can change bookings without calling.
5. Customer Rescheduling and Cancellation
Customer self-service cuts calls and manual updates. Let customers reschedule or cancel without calling or logging in. Include mobile-friendly links in every confirmation and reminder. Once staffing is covered, customers should be able to make simple changes themselves.
Set a 24-hour cutoff for online changes. Display cancellation terms and any fees on the booking page, then repeat them in the confirmation. Send requests made after the cutoff to staff.
Changes should update calendars instantly and notify both the customer and staff. Before reserving a new time, check that it still meets staff and service rules. Canceled slots should reopen immediately so small teams can refill them without staff intervention.
Test the entire process on a phone. Open the confirmation link without signing in, reschedule the appointment, then cancel it. Check that the old booking disappears, the slot reopens, and both sides receive the correct notice.
Once self-service changes work, test booking from your website and Facebook page.
6. Website and Facebook Booking Integration
Once customers can change their own bookings, make your website and Facebook easy ways to access the same booking system. A single live calendar avoids duplicate entry and keeps either channel from showing a slot that’s already booked through the other.
For your website, choose a copy-and-paste widget that works with your site’s embed block. For a simpler setup, add a visible “Book Now” button that links to a hosted booking page. Pick whichever option works without coding.
On Facebook, use that same calendar-backed system. Check whether your Page supports a “Book Now” button and whether your booking tool connects to it. If either option isn’t available, share the direct booking link in messages.
Test the booking process on a phone using Facebook’s in-app browser over cellular data. Confirm that the appointment appears on the staff calendar, the slot disappears from your website’s availability, and the confirmation goes out automatically.
Compare Website and Facebook Booking Methods
Every booking entry point should connect to the same live schedule. Compare the setup work for staff and the booking steps for customers, then choose the simplest way for customers to book.
| Booking method | Setup effort | Customer experience | Live schedule connection |
|---|---|---|---|
| Hosted booking-page link | Low: share the booking URL. | Takes customers to a separate booking page. | Syncs directly with the booking system’s live availability. |
| Embedded scheduler | Moderate: add embed code to a website page. | Customers book without leaving your website. | Shows live staff and service availability. |
| Website booking button | Low to moderate: set up a link or pop-up. | Customers start booking from a clear button on your site. | Opens the connected scheduler. The button itself doesn’t manage availability. |
| Facebook booking link or action button | Low for a link; setup varies for an integrated button. | Customers start booking from your Page. | Connects to the same live schedule through the booking provider. |
Look for an option customers can use quickly without adding manual work for staff. Check which methods your Page and booking provider support, including whether each opens a separate booking page or a fully integrated booking flow.
Final Checklist: Test the Booking Process
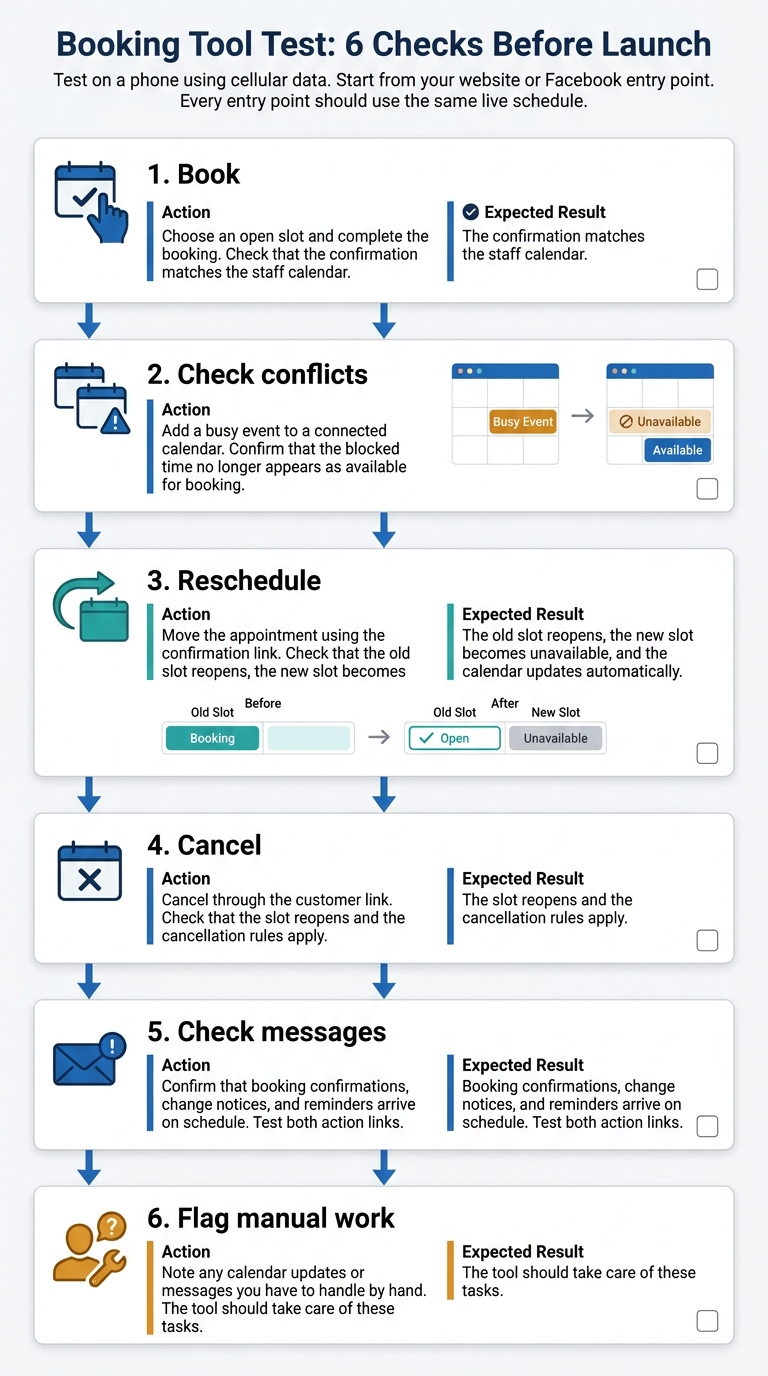
Booking Tool Test: 6 Checks Before Launch
Before launch, test the full booking flow on a phone using cellular data. Start from your website or Facebook entry point, and confirm that every booking entry point uses the same live schedule. Run each test below once before launch.
- [ ] Book: Choose an open slot and complete the booking. Check that the confirmation matches the staff calendar.
- [ ] Check conflicts: Add a busy event to a connected calendar. Confirm that the blocked time no longer appears as available for booking.
- [ ] Reschedule: Move the appointment using the confirmation link. Check that the old slot reopens, the new slot becomes unavailable, and the calendar updates automatically.
- [ ] Cancel: Cancel through the customer link. Check that the slot reopens and the cancellation rules apply.
- [ ] Check messages: Confirm that booking confirmations, change notices, and reminders arrive on schedule. Test both action links.
- [ ] Flag manual work: Note any calendar updates or messages you have to handle by hand. The tool should take care of these tasks.
FAQs
What happens if my calendar stops syncing?
When your calendar stops syncing, the booking system can’t read your schedule or see when you’re busy. Your booking page may show incorrect availability, often leading to double bookings when customers choose times you’ve already committed to something else.
Keep your calendar connection active and up to date so customers see your actual availability.
How can I measure time saved by online booking?
Track how long it takes, on average, to schedule one appointment. Include messages, calls, and manual calendar updates. Multiply that time by your weekly bookings, then subtract the time you spend managing your online booking system. Factor in time saved handling rescheduling requests and fewer no-shows, too.
To estimate return on investment, compare the value of administrative time saved, recovered bookings, and protected senior staff time with the software’s cost.
How can I protect customer and staff data?
Collect only the details you need to provide the service. Keep records in your booking tool, not in unprotected spreadsheets or email threads. Use the tool’s built-in payment processor so sensitive financial data goes straight to the secure provider – not through your forms or email. Check that the platform provides a clear audit trail and periodic data exports so you stay in control of your records.


